For VR Players
Playing Comfortably
in VR
This page explains the recommended hardware, connection methods and settings for enjoying the VR mode of Super Real Mahjong Venus Returns comfortably.
If the game feels heavy, the image stutters, or VR Mode will not start at all, the cause is often your hardware, the way your headset connects to your PC, or a setting on the PC side - and it can often be improved. Please try the steps on this page.
Check these first
- VR Mode will not start / "VR device not found" is shown → See this section
- SteamVR feels heavy → Set the render resolution to 100% or lower
- Using a Meta Quest → We recommend connecting via Steam Link
- Meta Horizon Link feels heavy → Set the render resolution to 1.0x or lower
- Your graphics card has 8GB of VRAM and the game feels heavy → Set "Graphics Quality: VR" to "Low"
Recommended Hardware
For smooth performance
VR Mode requires more graphics power than Desktop Mode. In particular, the amount of VRAM (video memory) on your graphics card can affect performance.
If you want plenty of headroom with "Graphics Quality: VR" set to "Medium" or higher, we recommend 10GB of VRAM or more.
Even with an 8GB card (e.g. GeForce RTX 3070), you can enjoy the game at "Medium" by also applying the connection method and render-resolution settings described on this page.
If the game still feels heavy, try setting "Graphics Quality: VR" to "Low".
Title screen → "Display Settings" → change "Graphics Quality: VR"
* You can check your PC's VRAM in Task Manager: "Performance" tab → "GPU" → "Dedicated GPU memory".
* For the latest system requirements, see the Steam store page for VR Mode.
If You Use SteamVR
Check the render resolution if performance is poor
When playing through SteamVR, the default "Auto" setting can push the render resolution too high and make the game run poorly. If the game feels heavy, follow the steps below to switch the render resolution to "Custom" and set the resolution per eye to 100% or lower. Start at 100%, and if it is still heavy, lower it step by step to around 80%.
* "100%" does not mean the native panel resolution of your headset.
* These settings apply to any headset that uses SteamVR, including Meta Quest, PICO and HTC VIVE.
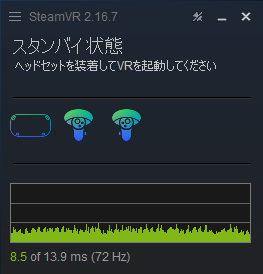
1Open the SteamVR menu
Click the hamburger menu (three-line icon) at the top left of the SteamVR window and select "Settings".
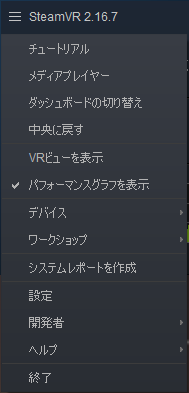
2Select "Settings"
Click "Settings" in the menu to open the SteamVR settings window.
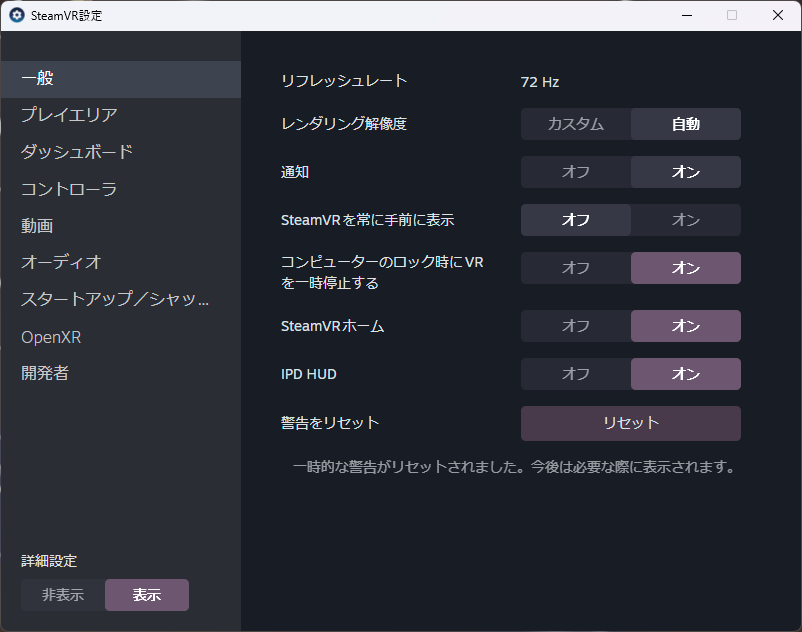
3Switch the render resolution to "Custom"
If "Render Resolution" on the "General" tab is set to "Auto", change it to "Custom".
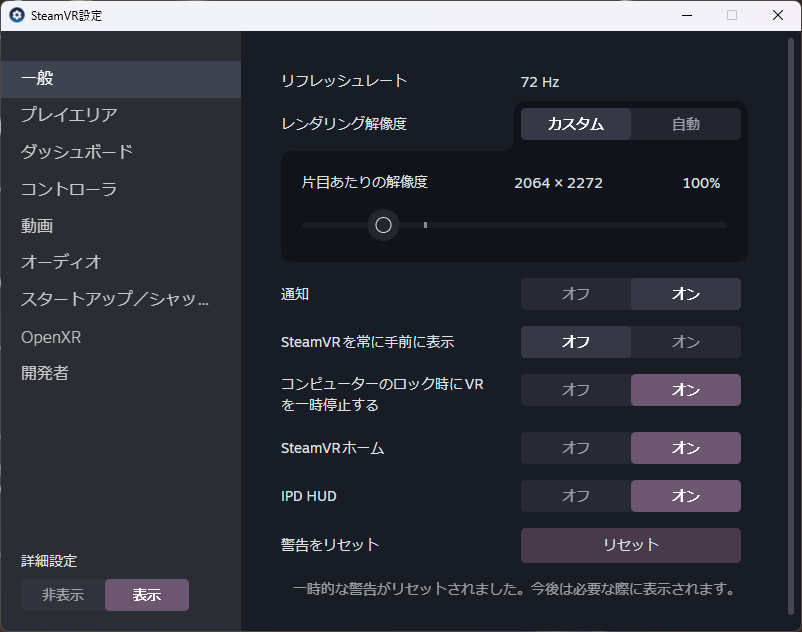
4Set the resolution per eye to 100% or lower
Set the "Resolution Per Eye" slider that appears to 100% or lower.
* Start at 100%. If the game is still heavy, lower it step by step to around 80%.
Connecting Your Meta Quest to Your PC
For Meta Quest 2 / 3 / 3S users - connection methods in recommended order
There are several ways to play PCVR on a Meta Quest, and which connection method you use makes a big difference to rendering load (VRAM usage).
The key is to keep only one VR runtime running on your PC. When the Meta Horizon Link app and SteamVR run at the same time, a large amount of VRAM is consumed before the game even starts, which can make it run poorly.
* If you use a non-Quest headset such as PICO or HTC VIVE, see Settings when using SteamVR.
| Connection method | Price | Connection | Notes |
|---|---|---|---|
| Steam Link | Free | Wireless only | Officially recommended. No Meta Horizon Link app needed on your PC - the easiest option |
| Virtual Desktop | Paid | Wireless only | Known for excellent streaming quality. Can launch games without SteamVR |
| Meta Horizon Link (without SteamVR) | Free | Wired / wireless | Lowest rendering load. Setup is somewhat advanced |
| Meta Horizon Link + SteamVR | Free | Wired / wireless | Two runtimes run at once - the heaviest configuration |
Playing via Steam Link
Recommended: a free and easy wireless connection
Steam Link is a free official app from Valve. Just install it on your Quest and it connects directly to Steam on your PC - no Meta Horizon Link app is needed on the PC. Since SteamVR is the only VR runtime running on your PC, the rendering load is lower than when Meta Horizon Link and SteamVR run together.
For the best experience, we recommend connecting your PC to the router by wired LAN, and your Quest to the same network over fast 5GHz Wi-Fi (Wi-Fi 5 / Wi-Fi 6 / Wi-Fi 6E).
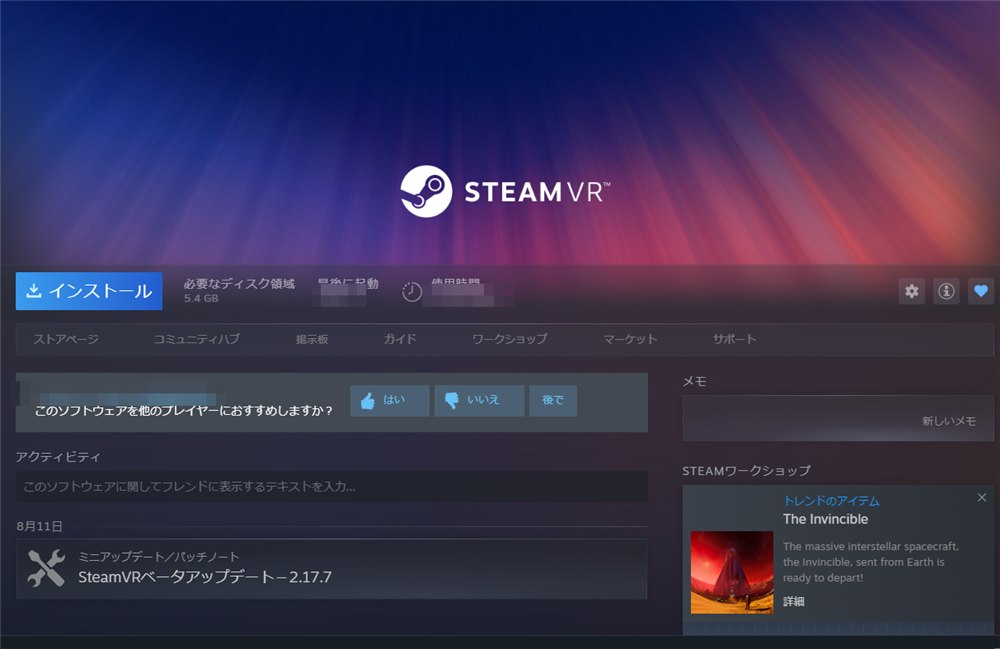
1Prepare Steam and SteamVR on your PC
Install Steam and SteamVR on your PC and keep Steam running. SteamVR can be installed for free from the Steam store / your library.
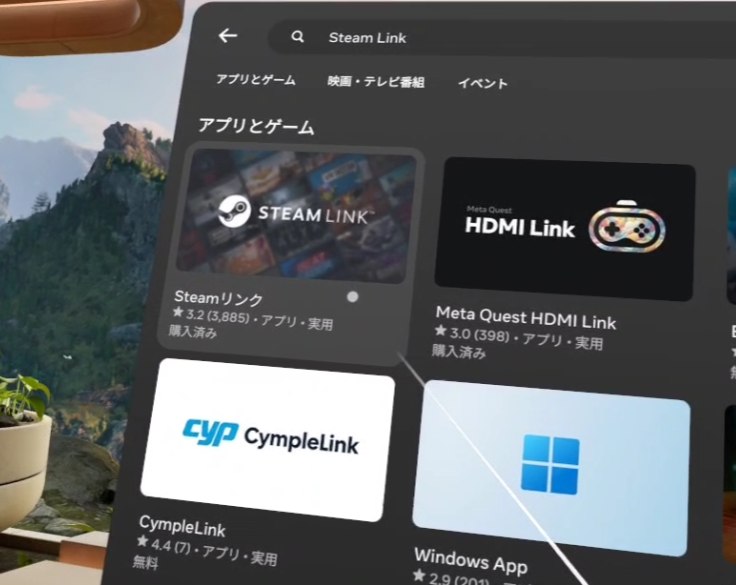
2Search for Steam Link on your Quest
Search for "Steam Link" in the Meta Horizon Store on your Quest.
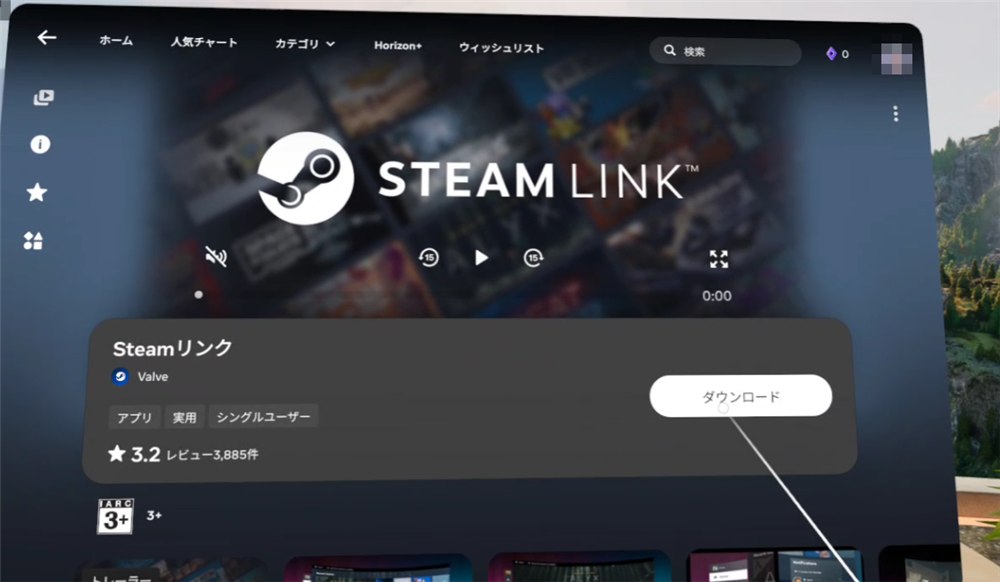
3Download Steam Link
Select "Download" on the store page to install it (free).
* Store page: Steam Link (Meta Horizon Store)
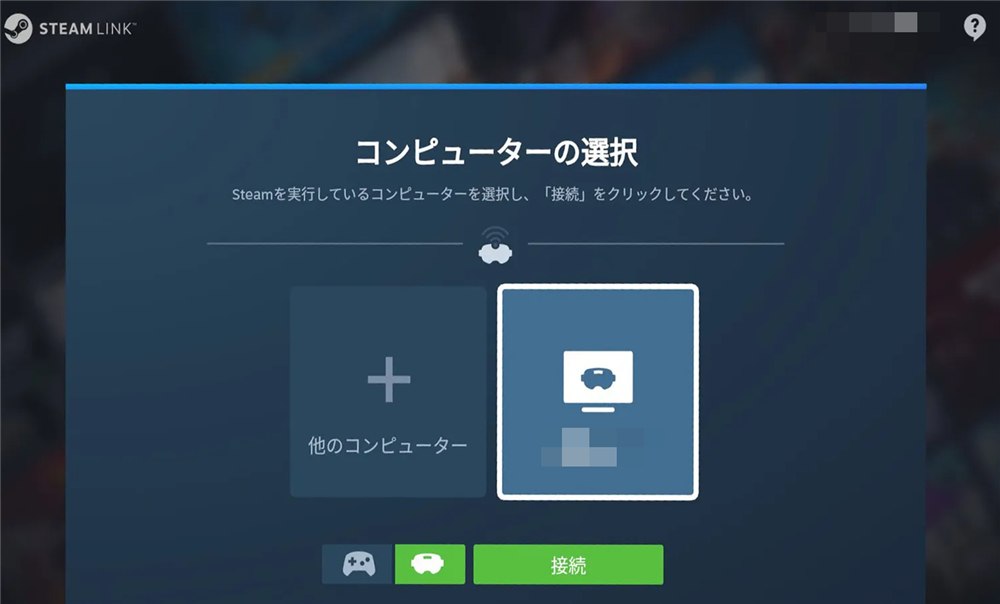
4Launch Steam Link and select your PC
Launch the Steam Link app on your Quest. PCs on the same network are detected automatically - select the PC running Steam and click "Connect".
* If you are asked to allow Wi-Fi and Bluetooth access on first launch, select "Allow".
5Enter the pairing code
Enter the 4-digit pairing code shown in your headset into Steam on your PC to pair the devices.
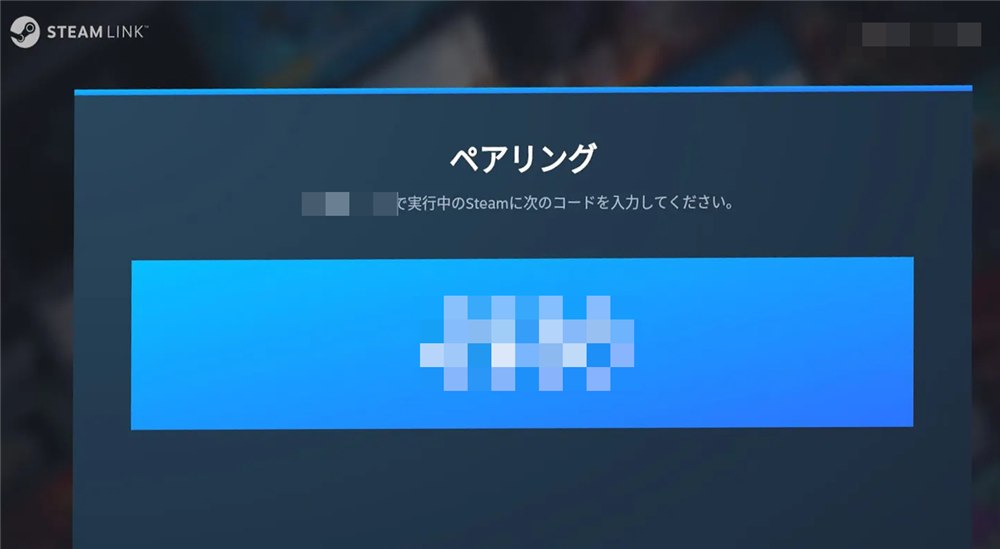
Once connected, SteamVR starts and your PC screen appears in the Quest. Launch the game from your Steam library and enjoy.
* If the game feels heavy, try the SteamVR render resolution settings.
* For more about Steam Link, see the official Steam FAQ (Steam Link).
Playing via Virtual Desktop
Wireless connection using a paid app (reference)
Virtual Desktop is a paid app that streams PC VR games to your Quest wirelessly. It is known for excellent streaming quality and stability, and its own OpenXR runtime (VDXR) lets you launch games without going through SteamVR.
- Purchase and install "Virtual Desktop" from the Meta Horizon Store on your Quest (install the free "Virtual Desktop Streamer" on your PC)
- Once connected, launch the game from Virtual Desktop's "Games" menu or from your Steam library
- Selecting "VDXR" as the OpenXR runtime in the streaming settings lets you launch without SteamVR
* Virtual Desktop is a third-party app, and we cannot guarantee that the game will work with it.
Playing via Meta Horizon Link
Two ways to connect: wired (Link) / wireless (Air Link)
Install the Meta Horizon Link app (formerly the Meta Quest Link app / Oculus PC app) on your PC.
Then connect your Quest 3 / Quest 3S / Quest 2 to the PC via wired Link or wireless Air Link.
* The Meta Horizon Link app can be downloaded from the official Meta website.
WiredLink (cable connection)
Connect with a USB cable. The most stable and reliable option.
- Launch the "Meta Horizon Link" app on your PC
- Connect the Quest to the PC with a USB-C cable * Use a USB 3.0 (5Gbps) or faster cable. The charging cable included with the headset may not work properly
- Put on the Quest
- Press the Meta button on the controller and open Quick Settings
- Select "Link"
- Select the PC to connect to and choose "Launch"
This puts you in PC VR mode, and VR apps launched on the PC are displayed in the Quest.
WirelessAir Link (Wi-Fi connection)
Connect over Wi-Fi. No cable needed.
- Launch the "Meta Horizon Link" app on your PC
- We recommend connecting the PC to the router by wired LAN * If the PC is also on Wi-Fi, the extra wireless hop makes the image more likely to break up
- Connect the Quest to the same router's Wi-Fi * We recommend a fast 5GHz or better Wi-Fi environment (Wi-Fi 5 / Wi-Fi 6 / Wi-Fi 6E)
- Press the Meta button on the controller and open Quick Settings
- Select "Link", then switch to "Air Link"
- Select the PC and pair
- Choose "Launch"
Launching Without SteamVR (Advanced)
We have confirmed that in some environments, launching the game through SteamVR increases the rendering load (makes the game heavier). After connecting via Meta Horizon Link, setting the OpenXR runtime to Meta Horizon Link prevents SteamVR from starting even when you launch the game from Steam, keeping the rendering load at its lowest.
- Launch the "Meta Horizon Link" app on your PC and open "Settings"
- Open the "General" tab
- Under "OpenXR Runtime", set Meta Horizon Link as the active (default) OpenXR runtime * Administrator rights are required. The setting applies to the whole PC. Depending on the app version, this may be labeled "Meta Quest Link"
- Launch the game from your Steam library (confirm that SteamVR does not start)
* To revert, open SteamVR's "Settings" → "Developer" → "Set SteamVR as OpenXR Runtime". Revert this if other VR games need SteamVR.
Render Resolution When Using Meta Horizon Link
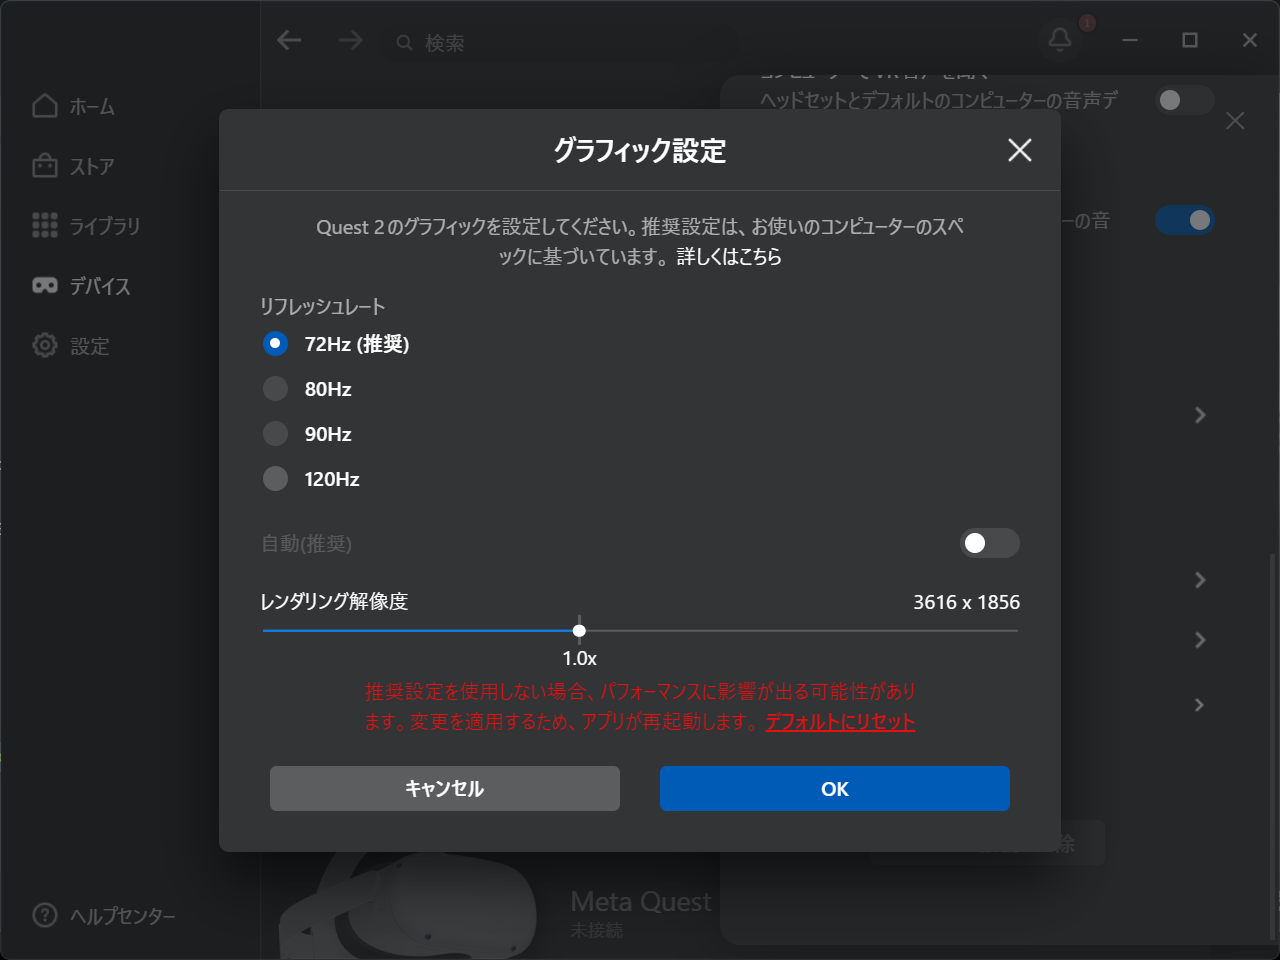
When connecting via Meta Horizon Link, setting the render resolution to "1.0x" or lower also lightens the load. If the game feels heavy, try the steps below.
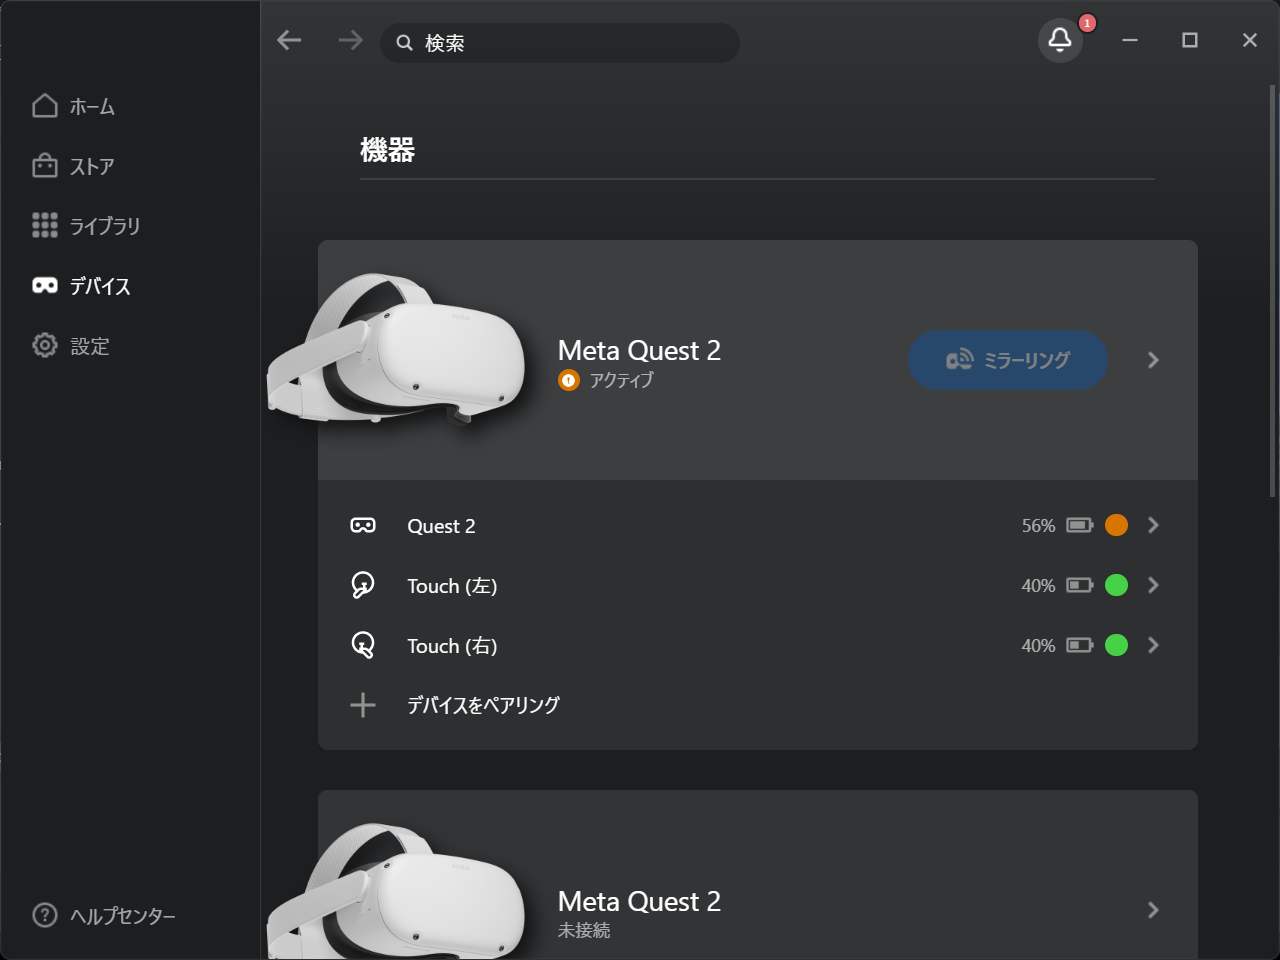
1Click the Meta Quest icon
On the "Devices" screen of the Meta Horizon Link app, click the icon of the connected Meta Quest.
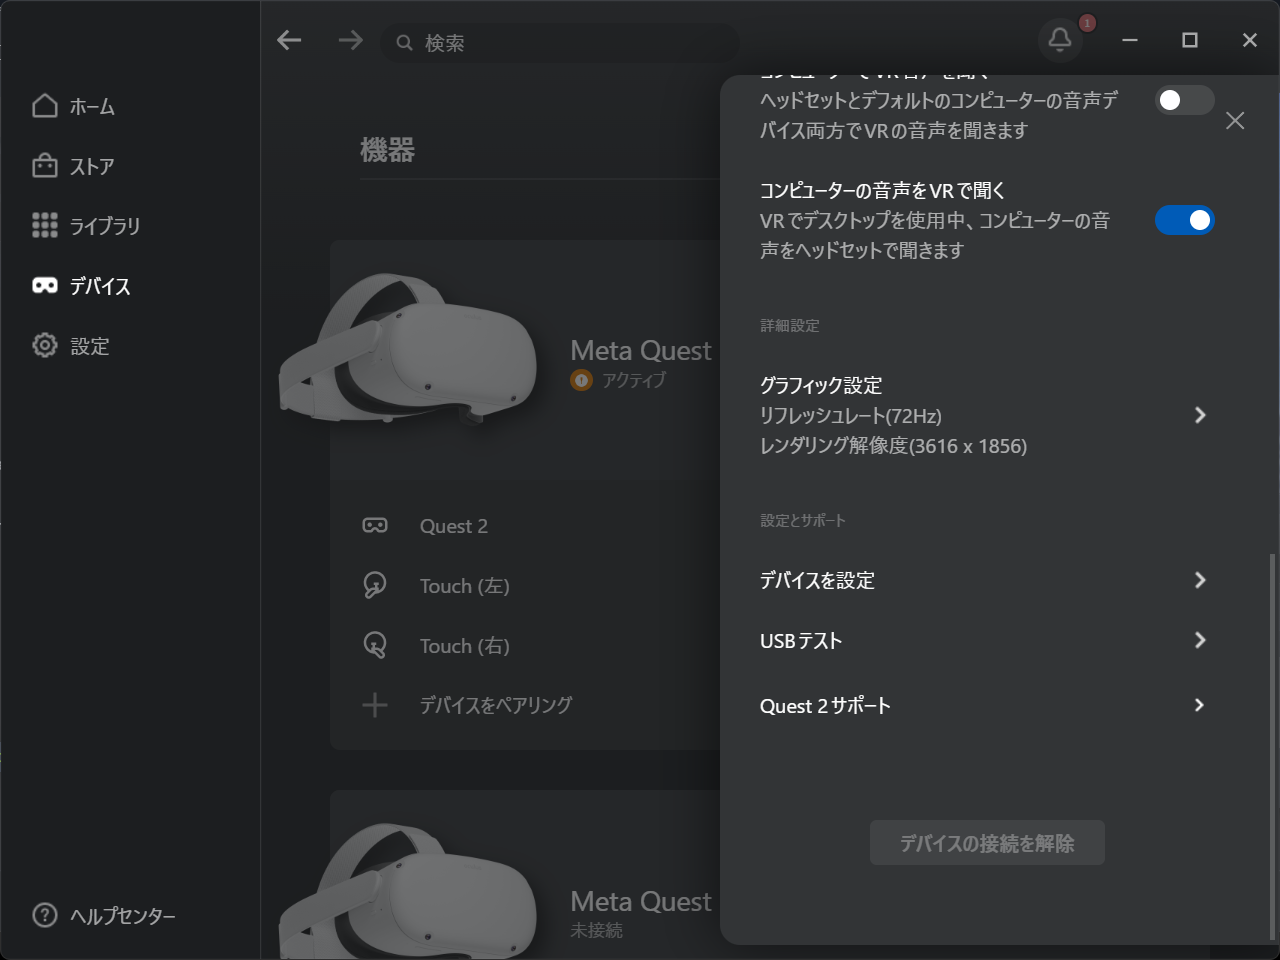
2Click "Graphics Preferences"
When the device detail panel opens, click "Graphics Preferences" under advanced settings.
3Turn off "Auto" for the render resolution
If "Auto (recommended)" is ON in the graphics settings, switch it OFF.
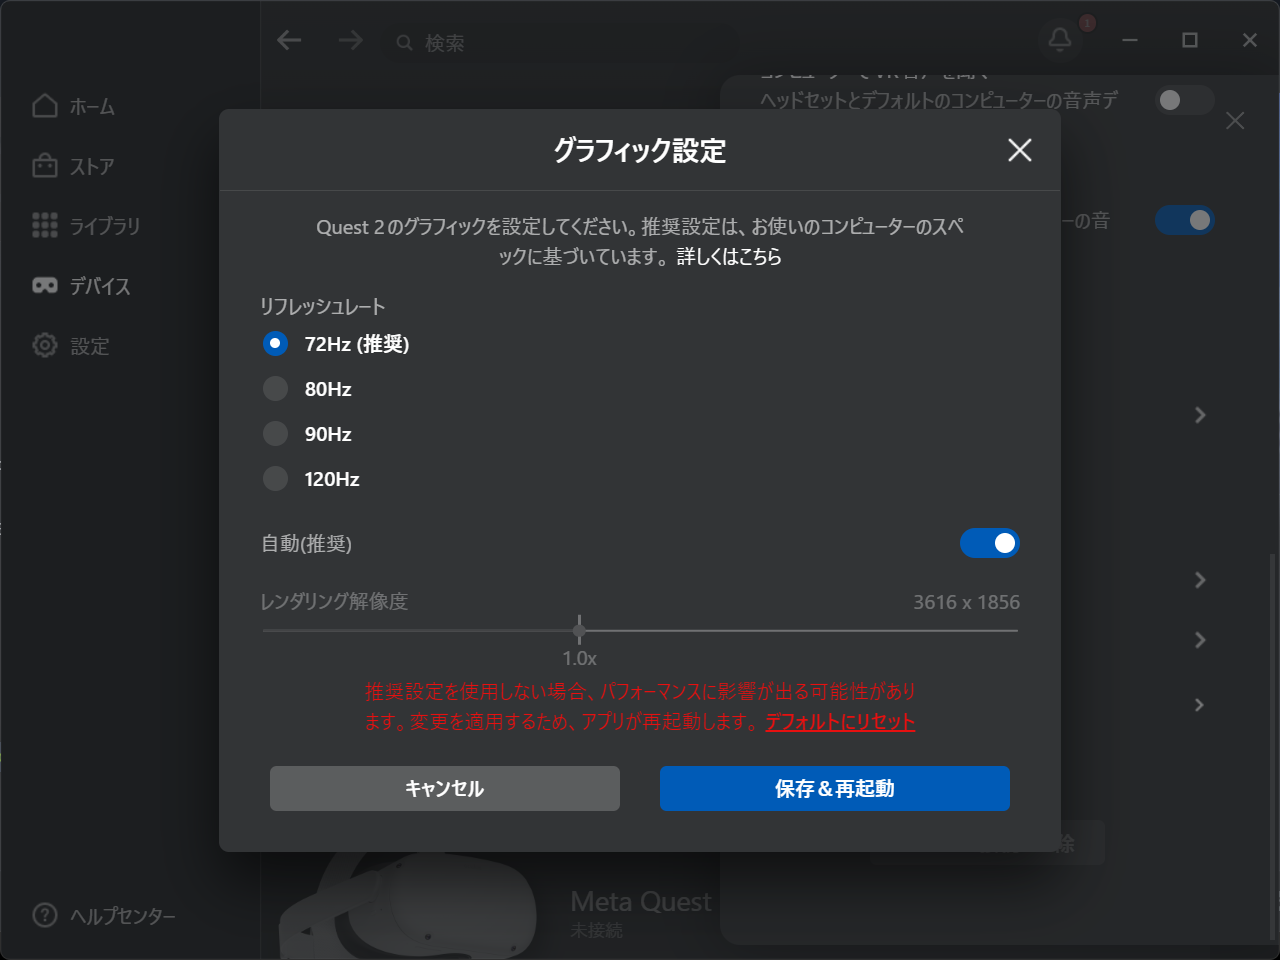
4Set the render resolution to "1.0x" or lower
Set the "Rendering Resolution" slider, which becomes adjustable once "Auto" is off, to "1.0x" or lower, save, and restart the app.
* Start at "1.0x". If the game is still heavy, lower it further.
Using Meta Horizon Link Together with SteamVR
When the Meta Horizon Link app and SteamVR are used together (launching through SteamVR), two VR runtimes run at the same time and consume VRAM twice over, making this the heaviest configuration.
If you play this way and the game feels heavy, try both the SteamVR render resolution settings and the Meta Horizon Link render resolution settings.
If VR Mode Will Not Start
What to check when "VR device not found" is displayed
Your headset is connected correctly, but starting the game shows "VR device not found", or the game starts in Desktop Mode instead of VR Mode. In cases like these, a VR setting on the PC side may be the cause.
Please check the following in order. They are listed from the easiest to try.
1. Check the VR Mode DLC
VR Mode requires the VR Mode DLC. If you only own the base game, VR Mode will not start.
Right-click the game in your Steam library → "Properties" → "DLC", and make sure the VR Mode DLC is listed and ticked
※The DLC store page is here.
2. Check your connection
- SteamVR is running on your PC
- In the SteamVR window, the headset and controller icons show as connected ※If they are greyed out or blinking, the connection is not complete yet
- With that state, launch the game from your Steam library
※For the steps for each connection method, see Connecting your Meta Quest to your PC.
3. Check the OpenXR runtime
VR software talks to your headset through a shared mechanism called "OpenXR". Which software acts as the gateway (the OpenXR runtime) is set once for the whole PC, and if that ends up in an unintended state, your headset may not be detected.
The menu at the top left of the SteamVR window (three-line icon) → "Settings" → "OpenXR"
"Current OpenXR Runtime" shows which software is currently the gateway.
If it is something other than SteamVR (Oculus in the screenshot), click "SET STEAMVR AS OPENXR RUNTIME".
※If you cannot find this button, SteamVR is already set as the gateway. No change is needed.
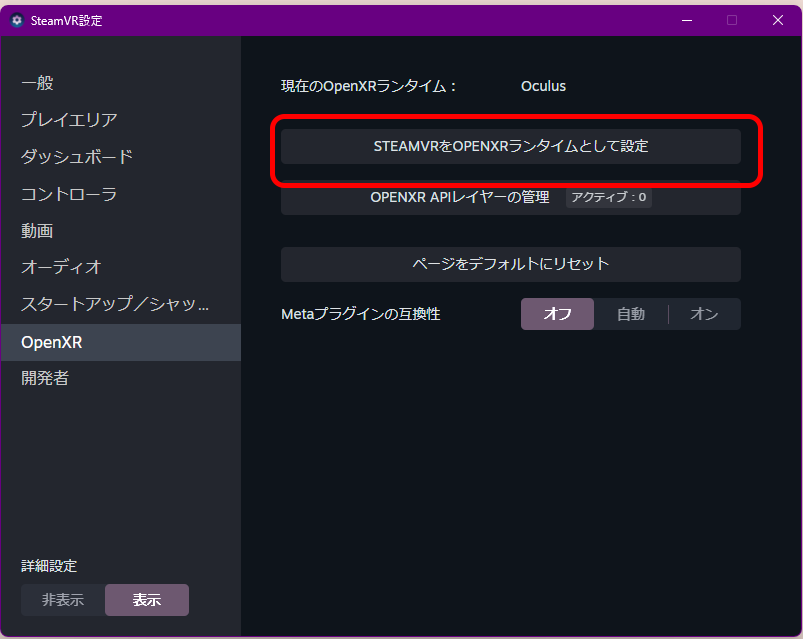
※Depending on your SteamVR version, this may be inside the "Developer" tab.
※If you use Meta Horizon Link as the gateway, please also see Launching without SteamVR. If the game starts correctly with that setup, no change is needed.
4. Check the OpenXR API layers
VR-related tools installed on your PC can hook into VR as an "OpenXR API layer". We have seen cases where such a layer prevented the game from starting.
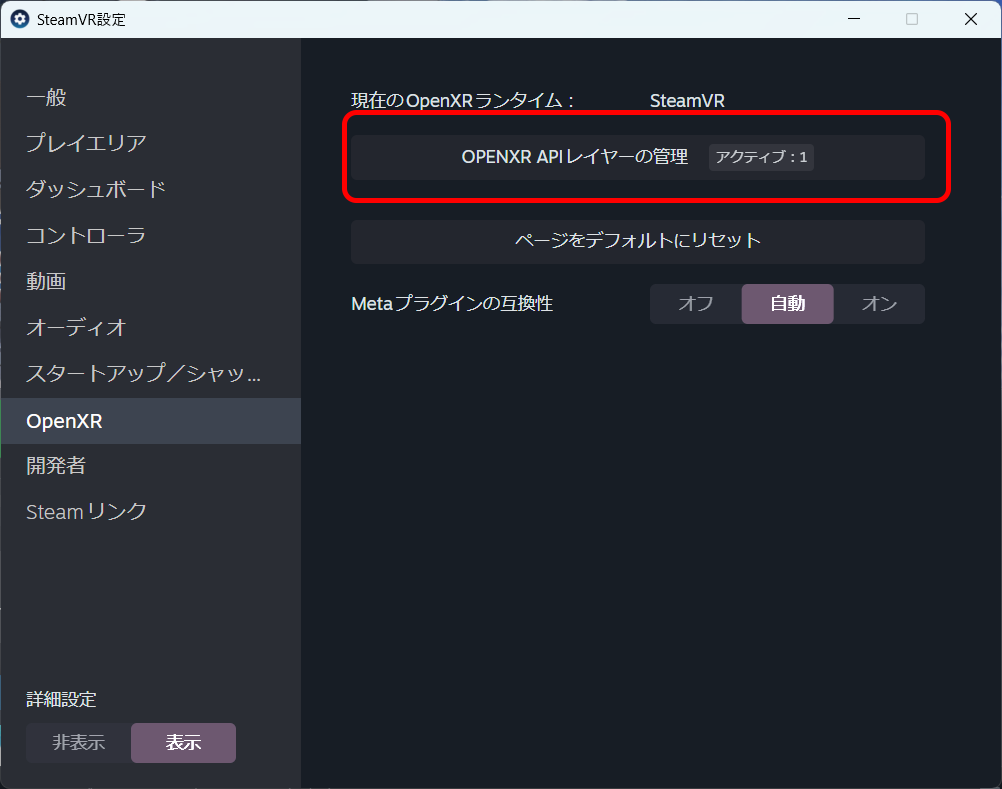
On the same "OpenXR" page, the number of enabled layers is shown next to "MANAGE OPENXR API LAYERS".
If it says "Active: 0", this item does not apply to you.
① Check the number of enabled layers.
If it shows "Active: 1" or more, click "MANAGE OPENXR API LAYERS" to open the list.
② Turn the listed layers off.
Set everything in the list to "Off" for now, confirm that it reads "Active: 0", and try again.
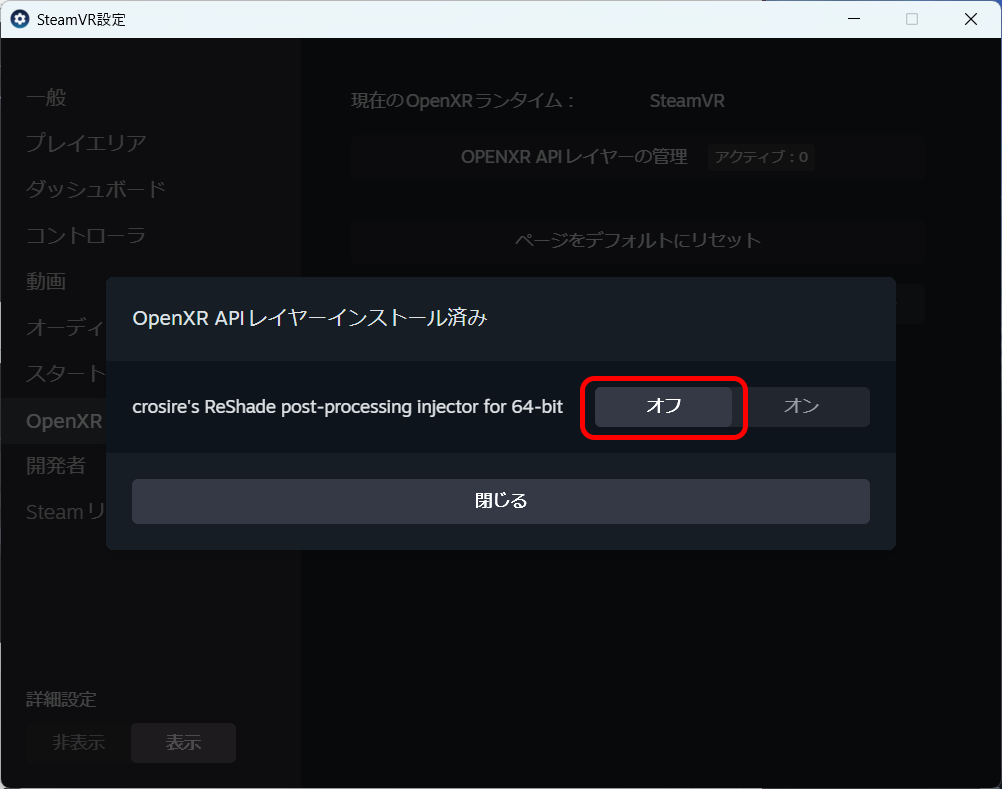
Tools like the following apply. Many of them adjust image quality or display a frame rate counter, so they are easy to overlook as a cause of VR trouble. Please open the list and check for yourself.
- ReShade
- OpenXR Toolkit
- OpenComposite
- fpsVR
※After turning them off, restarting your PC before trying again makes the result more reliable.
※Once the game starts, turning the layers back on one at a time will tell you which one was involved.
If the problem persists
Sorry for the trouble - please contact us through the contact form. Letting us know the following will help us narrow down the cause.
- Do other VR titles run correctly in the same environment? ※This is the single most useful clue
- What was listed in step 4 above?
- Your VR headset and how it connects to your PC (Steam Link / Link / Air Link / Virtual Desktop, etc.)
- Your PC specs (OS, CPU, memory, graphics card) and your SteamVR version
From the Development Team
The development team plans to address these performance issues in future updates so that more players can enjoy the game comfortably in more environments.
"Graphics Quality: VR" is currently limited to "Medium" at most. We are working on performance tuning and will lift this limit in an update as soon as we can. Thank you for your patience.
We apologize for the inconvenience and appreciate your understanding.
The Super Real Mahjong Venus Returns Development Team